Understanding the Native side of React Native (iOS & Android)
This section describes some of the more important concepts and components relating to native (Android & iOS) app development. While these areas are often hidden away, as is the benefit of React Native, often times it is necessary to delve into these aspects due to a cryptic error message or gap in community and open source packages.
Android
This section is dedicated to developers who are looking to understand a bit more about what goes on under the android/ folder in the native app's source code. Obviously you can go ahead and read the official docs for each of these topics, but that's probably overkill since we're not really changing these files too often.
Android SDKs
Updating the Android SDK is analogous to updating the version of React Native we use in our project.
Every now and then we might need to update the Target SDK Level of our native android project. This property in build.gradle tells gradle which Android SDK should be used to compile the native code of our application.
A very common side effect of updating Android SDKs is seeing our native third-party libraries failing to compile because they depend on deprecated or inexistent SDK features. For this reason (and many others that I can't enumerate), treat updating the Android SDK as a high-risk procedure.
It's also extremely important to test a wide range of Android versions after updating the SDK level (or at least the minimum and the maximum Android version we support), as more often than not Google will stop supporting APIs in older API levels.
Gradle & gradle files
Gradle is like the npm of native android projects, except on steroids. It controls:
- Dependency resolution
- Build variants
- Application & dependency versioning
- Application signing
- Build scripts
Any syntax issues arising from a misconfigured .gradle file will prevent the Android app from compiling. That's because Gradle runs every time you try to run or build the app. The following article explains it better than I ever would: Understanding Gradle: The Build Lifecycle
Much like the previous section (Android SDKs), updating the version of Gradle (under android/gradle/wrapper/gradle.properties) may also cause several of our third-party libraries to stop working due to usage of deprecated / inexistent Gradle features.
Gradle files are written with Groovy . The best way to change & make sure any Gradle changes are valid is to edit them in Android Studio, as it will notify you of any errors when you go “Reload Gradle Changes”.
Gradle will try and download all dependencies by checking each of the
repositories we have in android/build.gradle. Following that logic,
google(), mavenCentral(), jcenter() and others are analogous to npm (not
the CLI, the actual repository at the npmjs.com website).
Error logs (Logcat)
You can use Logcat (from within Android Studio) to inspect the native (!) logs coming from an emulator or device. This is specially useful when trying to figure out the cause of a hard-crash (e.g. a crash that happens outside of React Native).
Opinions may vary here, but if you don't know how to read native Android error stack traces then you still have a long way to go with mobile app development. And there's nothing wrong with that, since most of these issues are currently handled by someone from the App Core. Take your time & every chance thrown at you to fix native issues if you're keen on expanding your knowledge beyond JS.
Read more about logcat here: https://developer.android.com/studio/debug/am-logcat
Analyzing stack traces: https://developer.android.com/studio/debug/stacktraces
TL;DR; of stack traces:
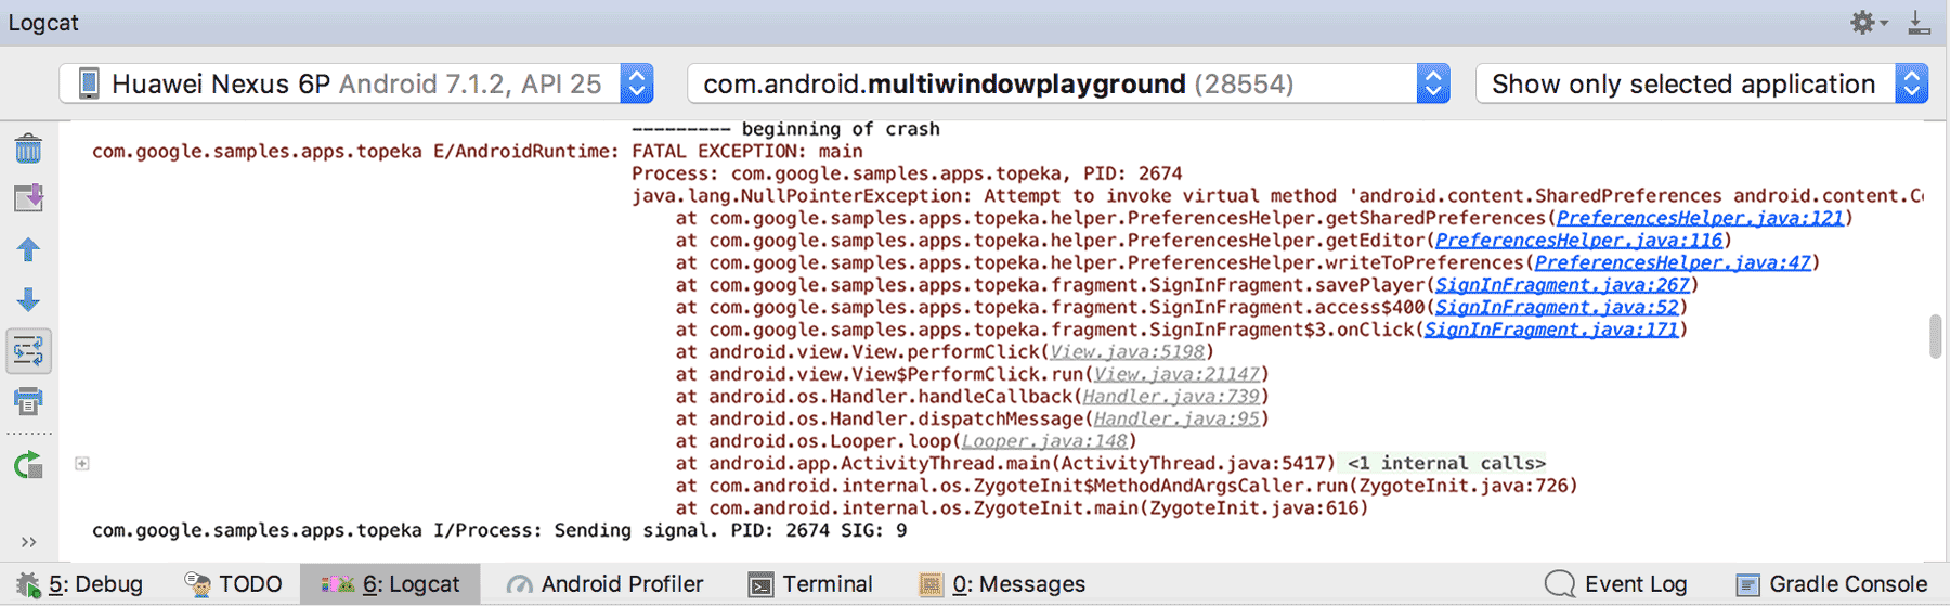
- A stack trace in Android is read from top to bottom
- The top-most lines will usually contain what you're looking for, as they're closest to your code and your direct dependencies.
- The further down you go in a stack trace, the less likely you are from finding the real cause of an issue. That's because the bottom-most lines will point to instructions running in the Android internals, and we can't really change those.
- You can usually stop reading a stack trace when you get to the line containing
android.os.Looper.loop. Anything below that is not accessible. - You'll usually only need to Google the top-most line to find other people with the same issue. In the image above, the line we care about is
java.lang.NullPointerException: Attempt to invoke...
More information on using logcat in Android studio
- Open android studio
- Run the emulator via the usual yarn blah
- Click on the logcat menu option
- Go to debuggable processes (for example:
com.nedsintl.neds.uat) - You will see all the processes available to debug
- Notice that you can set debug levels (verbose | debug | info | error)
- And more importantly, you can craft the regex easily on the search bar
This should replace the general accepted route for checking android logs through adb logcat -s "something-foo" at the terminal.
Diagnosing android native crashes
Finding the reason for all that red in logcat is unfortunately not as simple as just reading it. The Android docs have some good resources to at least help though:
Manifest
The AndroidManifest.xml file is 🥁🥁🥁🥁... a manifest. A manifest of:
- The resources an application needs from the OS
- The permissions an application needs from the OS
- What's the application entry point
- Which Activities (read below) it contains
- Which icon this application uses
- And many other things...
You'll notice we have an AndroidManifest.xml file for the debug/ and main/ source sets. That's because the Gradle build does something known as Manifest merging. Manifest merging is specially useful when managing different build variants / flavours. You can read all about it here:
https://developer.android.com/studio/build/manage-manifests
Activities
Activities are simply “Screens” in the Android side of things. As you can see from our application, we only have one Activity living in our codebase: [MainActivity.java](http://MainActivity.java). This is the activity responsible for rendering the “canvas” used by React Native to render components on.
React Native does all of its heavy lifting from the context of this single Activity. All the things you see in our app are handled by a single JS engine (V8/hermes) that runs from the context of this MainActivity.java . It sends and receives messages from/to the JS context living inside of this engine and renders whatever we want to render in this Activity.
App Signing
Apps in android need to be signed with a security certificate before being distributed to the Play Store.
When creating a new Android project you'll be given a default debug keystore (app/debug.keystore) that will be used to sign the app whilst in development.
When it comes to publishing an app, you'll either need to manage your own keystore OR use Play Store's App Signing. Regardless of which one you choose, all you need to know is:
- Keystores are extremely risky if in the hands of the wrong person. This is because Play Store expects updates to an existing app to ALWAYS be signed with the same signing key. This means someone could easily publish a modified version of your app if they also had access to your Play Store account.
- If you lose your production Keystore OR forget its password, you're essentially blocked from releasing updates to your app. These should be backed up in multiple secure file storage services.
If you're not in the App Core team you'll most likely never have to deal with this.
iOS
This section is dedicated to developers who are looking to understand a bit more about what goes on under the ios/ folder in the native app's source code. Obviously you can go ahead and read the official docs for each of these topics, but that's probably overkill since we're not really changing this files too often.
CocoaPods
CocoaPods is like the npm of node or Gradle of Android projects: it handles the resolution & fetching of dependencies for Xcode projects.
When first adding CocoaPods to a Xcode projects a few things will happen:
- It will tell you to stop opening any
.xcodeprojfiles. - It will create a new
Pods.xcodeprojunder<projectRoot>/Pods - All dependencies declared in
Podfilewill be placed under<projectRoot>/Podsand referenced from the newPods.xcodeproj - A new
.xcworkspacefile will be created. This Xcode Workspace will include both your.xcodeprojfile & thePods.xcodeproj. - Your original
.xcodeprojwill pull all of its third-party dependencies from this newPods.xcodeproj.
Once a project has been CocoaPods-enabled you should only use the .xcworkspace file, otherwise your project won't compile correctly.
Info.plist
The Info.plist files found under ios/ are analogous to the AndroidManifest.xml on Android. It is used to specify things such as:
- Application version
- Application name
- Supported orientations
- The text displayed in permission request dialogs such as “Ladbrokes/Neds needs access to your location”.
A lot of the keys in this file are recognised by iOS/Xcode and are documented in Core Foundation Keys. Additionally, you may specify custom keys that can be later retrieved by using: [[NSBundle mainBundle] objectForInfoDictionaryKey:@"KEY_NAME"];
Error logs (Console)
You can use the Console app (comes with MacOS) to inspect the native (!) logs coming from a simulator or device. This is especially useful when trying to figure out the cause of a hard-crash (e.g. a crash that happens outside of React Native).
Opinions may vary here, but if you don't know how to read native iOS error stack traces then you still have a long way to go with mobile app development. And there's nothing wrong with that, since most of these issues are currently handled by someone from the App Core.
Viewing log messages on iOS: https://developer.apple.com/documentation/os/logging/viewing_log_messages
Examining the fields in a Crash Report: https://developer.apple.com/documentation/xcode/examining-the-fields-in-a-crash-report
Android Development Pro Tip
Occasionally wiping data from the android emulator makes it perform better
- Close the emulator
- Open android studio
- Launch Virtual Device Manager
- On the emulator list, select the down facing arrow
- Click on Wipe Data
- Restart emulator (and enjoy speed)
- Or get an M1 Mac