Installing & Running the App
Assuming you've followed all of steps in our First Time Setup guide, and have installed all the required software, you are now ready to build the app on your machine.
This will allow you to install and run our native apps on a virtual or physical mobile device, to debug your work in progress or test features and changes.
There are two kinds of builds we can make: Development and Production builds.
Except for rare cases, you will usually be working with development builds, however this guide covers both scenarios.
Development Builds
A development build is essentially our app's code, compiled together into a bundle, that is then packaged into a distributable app, that we can run either locally in a simulator (iOS) or emulator (iOS), or even on an actual physical mobile device. This development build is not suitable for release to actual end users, as it contains a lot of code that is specifically bundled to help you debug code changes that you are working on, including displaying error messages, assessing the apps performance, logging network requests, and visually inspecting UI changes, among other things.
By default, the development build points to our User Acceptance Testing (UAT) environment, meaning it hits a copy of our databases, back end services, and other resources that are not exposed to the outside world.
This is the type of build you will be using in almost every situation whilst working on the project, as production builds are generally only made manually to test some specific edge cases or scenarios, and require special permissions to be able to be used.
To make a development build, follow these steps:
- Open a terminal shell and point your prompt to the root folder of the project, if you're not already there:
cd react-native
developer.developerson@macbook ~ % cd react-native
developer.developerson@macbook react-native %
- Checkout to either
mainor the branch you're currently working on:git checkout main
developer.developerson@macbook react-native % git checkout main
Switched to branch 'main'
Your branch is up to date with 'origin/main'.
- Run the following command in your terminal window:
yarn.
developer.developerson@macbook react-native % yarn
This will do two things:
- Install all Node dependencies for the project, via the Node Package Manager.
- Install all of the native dependencies for the project, via CocoaPods package manager.
If you run into an issue while the Sentry CLI step of our Node dependencies
install is running, you can try running this command:
npm i -g @Sentry/cli
This will install the Sentry CLI globally on your machine, and then you can
re-run yarn to finish the install.
Android dependencies are automatically installed by the
Gradle build
tool when we are actually in the process of building the Android app bundle. It
isn't part of the yarn setup script. The only reason we install the iOS
dependencies with yarn setup is due to that step not being automated prior to
install when trying to load the app and are not part of the yarn setup script.
Building and running the app on an iOS Simulator or Android Emulator
The following steps will show you how to build our native app for either platform, and brand, to then run it in a virtual mobile device directly on your work machine.
- Start React Native Metro Bundler
The Metro Bundler is what compiles, bundles and serves the app's TypeScript and Node code in a transpiled and bundled JavaScript file, while you're developing. As you work, any changes you make and save will trigger Metro to re-bundle the code and send it over to the app running in the virtual mobile device, as well as allow you to debug your code, by acting as a server for any logging enabled in the app.
IMPORTANT: Make sure this process is running somewhere in the background whenever you want to launch the app, either in it's own terminal shell instance, or in a separate tab of the terminal shell you're currently using. If Metro isn't running, the app that may be running in the virtual device wouldn't be able to access the JavaScript bundle that has all the React Native code that gets changed and compiled on the fly as you work!
Open a terminal shell and run the following command, choosing the appropriate brand you want to develop/test. As we move towards native the React Native commands have been marked with :legacy and are no longer the default.
yarn {brand}:legacy
# e.g.
yarn neds:legacy
2a. Run on iOS Simulator
This will launch the iOS Simulator, and install the native app "shell" on it, which will then connect to the Metro Bundler instance running, build the React Native app and launch it.
yarn ios:{brand}:legacy
# e.g.
yarn ios:neds:legacy
# OR point to production
yarn ios:ladbrokes:legacy:prod
2b. Run on Android Emulator
This will launch the Android Emulator, and install the native app "shell" on it, which will then connect to the Metro Bundler instance running, build the React Native app and launch it.
yarn android:{brand}:legacy
// OR
yarn android:neds:legacy
A note on running the app on the Android Emulator
When running the app on the emulator for the first time, you may need to set up the same IP address in the React Native dev menu settings as the one being used for the machine where Metro is running. Without making these changes, you may see a Red error screen in the app saying that the app could not connect to Metro or that it could not find the android bundle file.
To fix this, Dismiss the error screen, and whilst still running the app, open the React Native DevMenu in the Android Emulator by pressing Cmd-M on your keyboard or triggering a device shake.
Once in the React Native DevMenu, navigate to the Debug Server Host & Port for Device section, and then set the debug IP address and port to the same one as your machine where you are running the Metro bundler. This should be the same IP address that you have in android/app/src/main/res/xml/debug_network_security_config.xml. This file will get generated (and isnt committed to your branch) when you run yarn setup.
Afterwards, Reload the app in the Emulator, and your app should be able to connect to Metro and download the app's JS bundle, for you to run the app in the Emulator.
Production config whilst using a debug build
Using this env variable when launching the Android emulator
ENV=production yarn android:ladbrokes:legacy # use production config in debug mode
Running Ladbrokes and Neds at the same time on 2 separate simulators (iOS)
Simulator 1 (Lads, normal startup):
yarn setupyarn ios:ladbrokes:legacy
This will be running off port 8081
Simulator 2 (Neds):
- Start up a second simulator manually (emu menu -> file -> open simulator -> iOS 15 -> iPhone 12)
yarn neds --port 8082yarn ios:neds:legacy --simulator='iPhone 12’<-- this has to match the simulator that you started manually (eg. both iPhone 12)- Wait till the app builds, then shake the device (Simulator top menu -> device -> shake)
- Press: configure bundler
- IP address should be your laptop’s (VPN if working from home) IP
- port: 8082
This will be running off port 8082
Now you should have both Lads and Neds running, any changes you make, should appear in both simulators.
Running the app and pointing to Stackz, Dev-Cluster or local GraphQL
For developers running the full Entain stack or testing local backend or GraphQL changes, the following steps should help you.
Stackz or Dev-Cluster
Your local stackz or dev-cluster environment will need:
- to be running the core and brand local BE environment.
- to be running respective brand FE config server.
- to be running the graphql server via stackz
Connect the whole project
To connect the whole Native Apps project (including React Native, Native Android and Native iOS) to your stackz or dev-cluster environment:
- Open a terminal in the Native Apps repository root directory
- Run
yarn stackzto start the configuration tool - You will be prompted to enter the hostname or IP address of your stackz or dev-cluster environment
- You can also leave the prompt blank and just hit enter to use the default
localhosthostname - The tool will update the configuration files in the three distinct projects to point to your stackz or dev-cluster environment
- Start/restart the metro bundler (e.g.
yarn ladbrokes) to apply the changes in the JavaScript configuration - Rebuild the app via Xcode or Android Studio to apply the changes in the Native configuration
- You can build to either simulator/emulator or physical devices and it should work
To reset the configuration back to the default values, you can run yarn stackz --reset.
This will reset the configuration files for React Native, Native Android and Native iOS back to their defaults (UAT).
Connect only Native Android
If you only want to connect the Native Android project to your stackz or dev-cluster environment:
- Open a terminal in the Native Android repository root directory
- Run
sh ./scripts/setup_local_override_propertiesto start the configuration tool - You will be prompted to enter the hostname or IP address of your stackz or dev-cluster environment
- You can also leave the prompt blank and just hit enter to use the default
localhosthostname - Rebuild the app via Android Studio to apply the changes in the Native configuration
To reset the configuration back to the default values, you can run sh ./scripts/setup_local_override_properties --reset.
Connect only Native iOS
If you only want to connect the Native iOS project to your stackz or dev-cluster environment:
- Open a terminal in the Native iOS repository root directory
- Run
sh ./scripts/setup-local-overrides.shto start the configuration tool - You will be prompted to enter the hostname or IP address of your stackz or dev-cluster environment
- You can also leave the prompt blank and just hit enter to use the default
localhosthostname - Rebuild the app via Xcode to apply the changes in the Native configuration
To reset the configuration back to the default values, you can run sh ./scripts/setup-local-overrides.sh --reset.
Local GraphQL only (no stackz)
If you want to test local graphql changes in the app without running the full stack, this is for you.
- Run your local
api/graphql-publicserver (see docs here) - Update
USE_LOCAL_GQLvar here totrue - If using a different port other than the default
5000, update theLOCAL_STACK_PORTS.graphqlvalues here - Restart the metro bundler.
Running on physical device
Note: if you aren't on the Entain network you will also have to enable a VPN on your phone much like on your laptop when you're WFH. Follow the steps below to configure and enable VPN on your phone.
Click to expand VPN setup instructions
- On your phone, go to System Preferences > General > VPN & Device Management.
- Select VPN and add VPN Configuration.
- Select type as L2TP.
- Make the Description whatever you want your VPN to be named in your phone (Entain VPN).
- Server will be something along the lines of dev-l2tp.gvcgroup.com.au - you can find this value on your laptop under System Preferences > Network > Entain VPN (or whatever you named it) to verify.
- Account with be fistname.lastname.
- Password is your password that you used to sign into AAD applications at Entain.
- Finally, Secret will be retrievable from OnePass and will be the same as the one you used on your laptop.
- Hit done in the top right and you should now have the VPN configuration available to enable and disable as you need it for testing.
iOS on physical device
If you haven't gotten access to the Apple Developer Program you can request access in #chapter-native-apps. Make sure you have access to both Neds and Ladbrokes.. you'll receive two invites.
Once you have access to your Apple Developer Account you can launch Xcode and sign in with your new developer account under Xcode > Preferences > Accounts. After that, in Xcode open an existing project and select the following project file located at:
/ios/ReactNative.xcworkspaceSelect ReactNative in the Xcode file explorer, select the target as "Ladbrokes UAT", and go to the Signing & Capabilities tab.
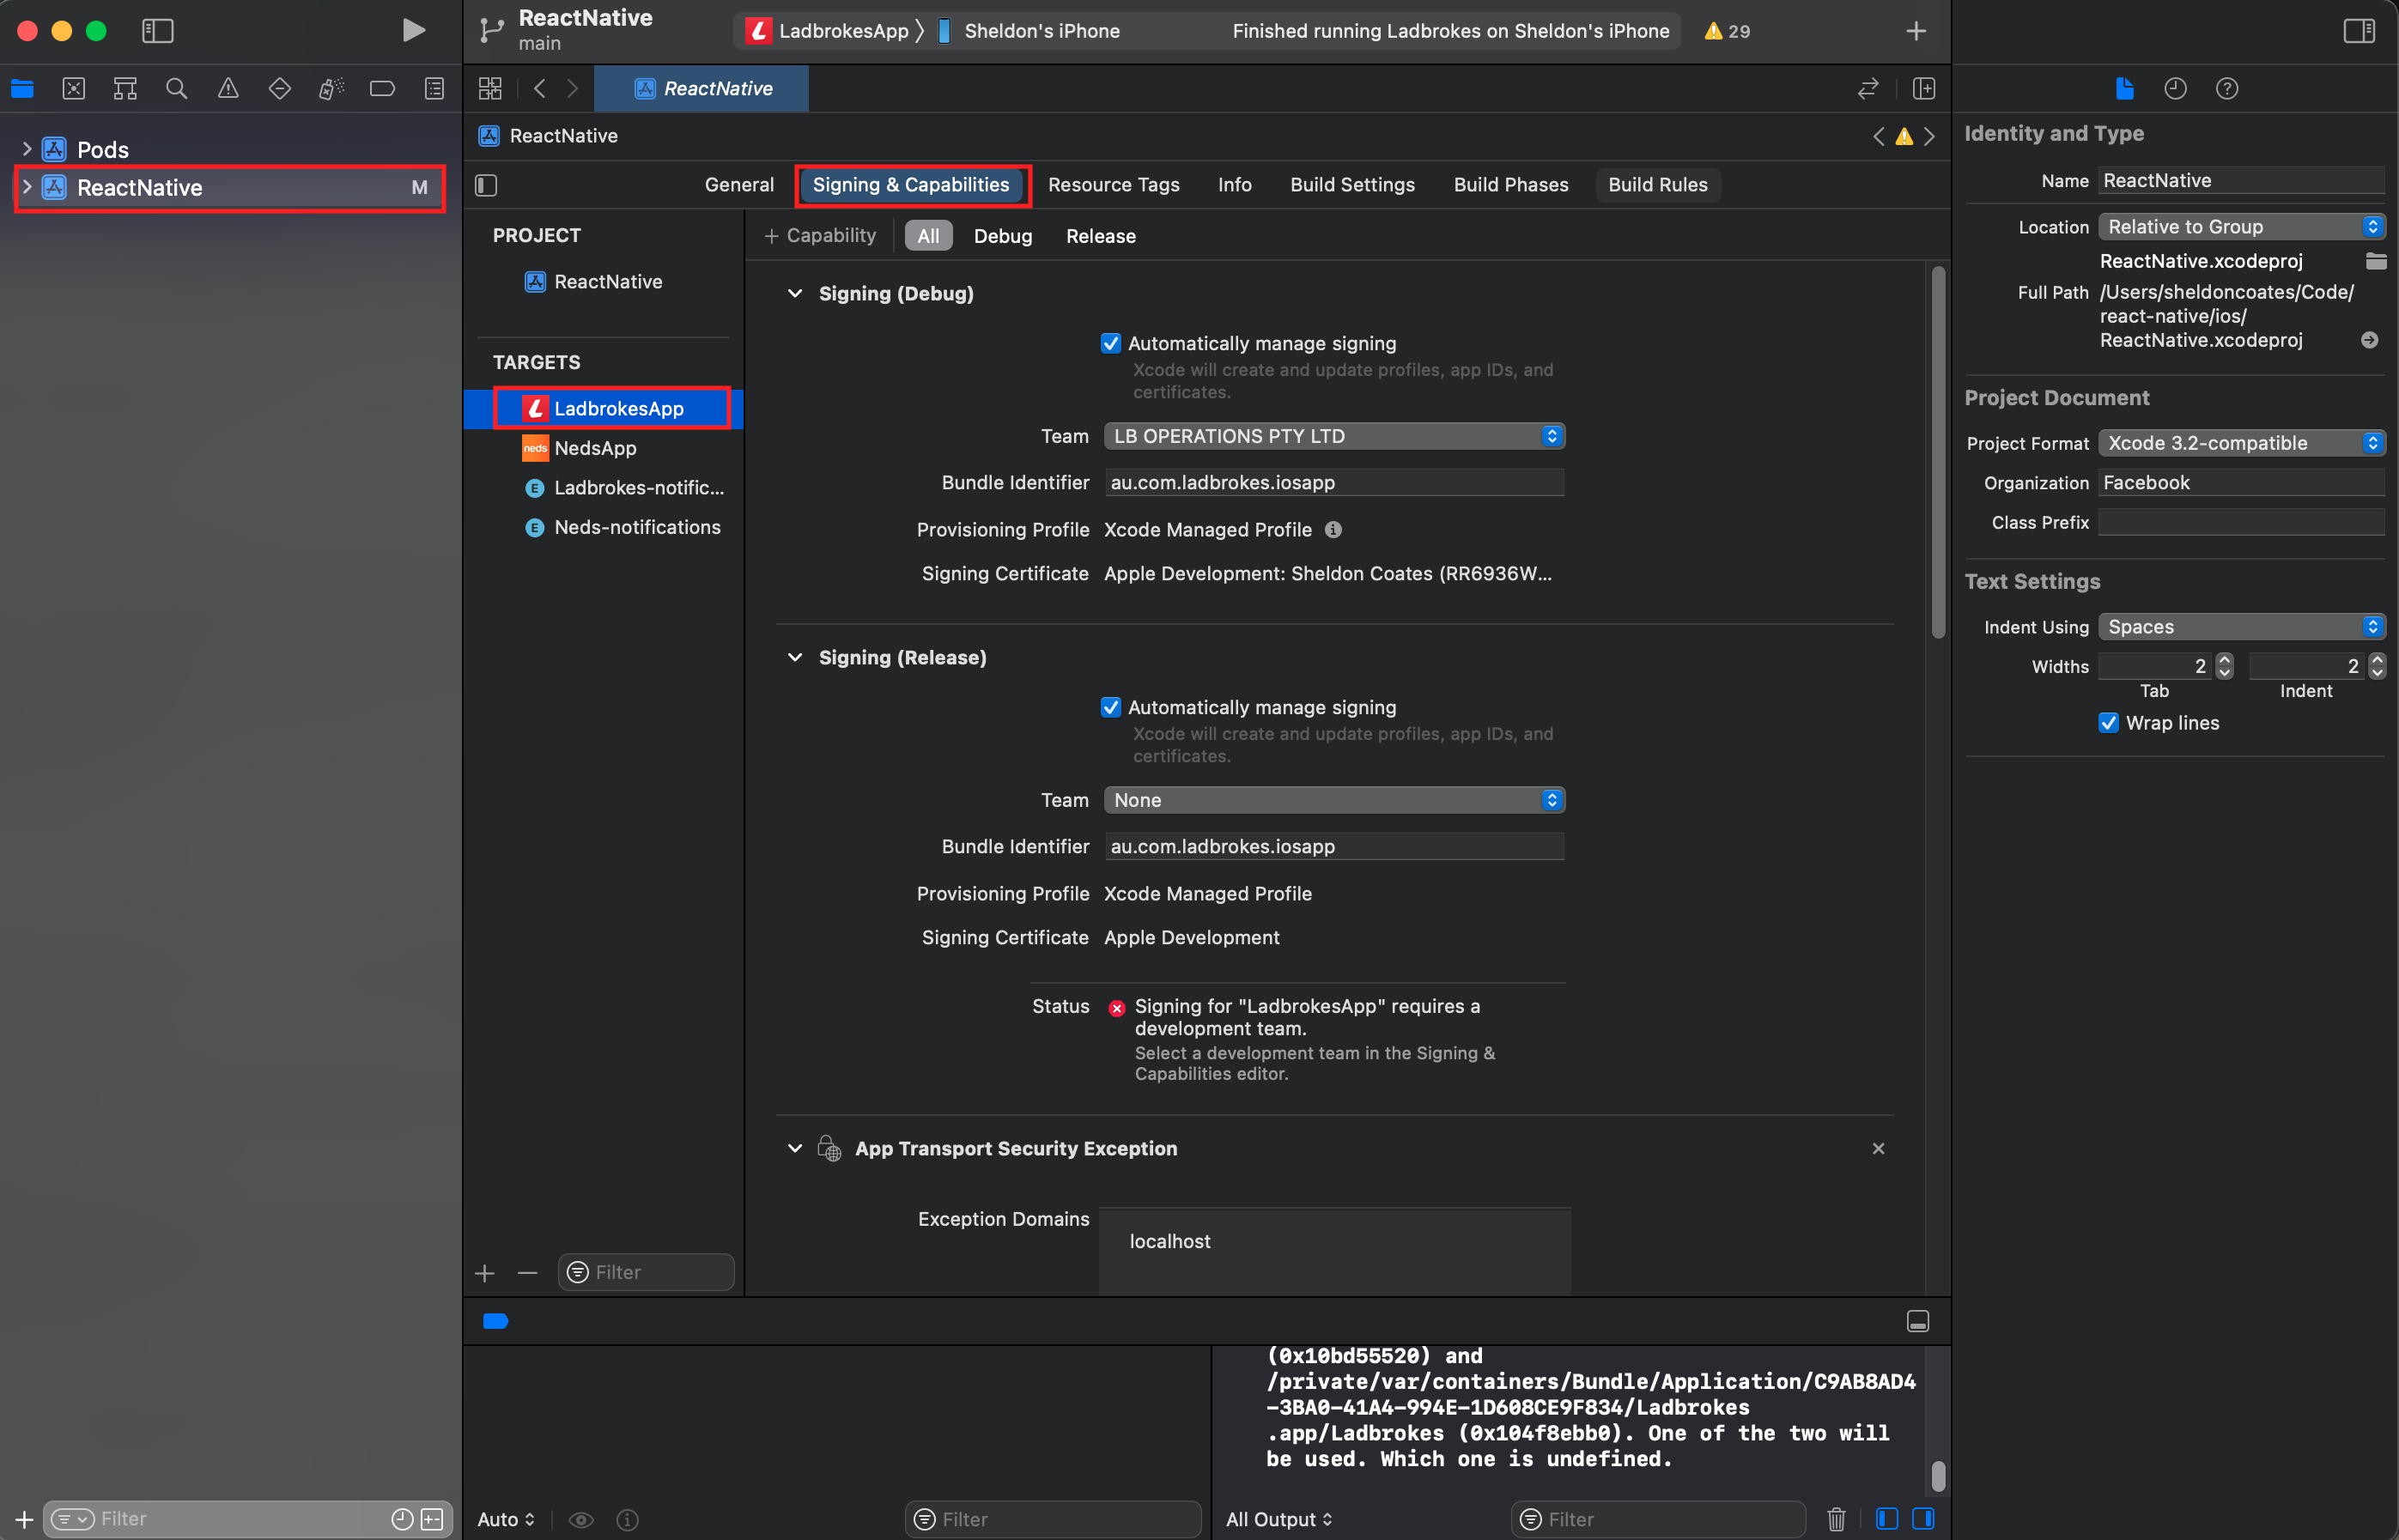
If "Team" is not selected (ie. none) automatically under the section "Signing (Debug)", then make sure you select LB OPERATIONS PTY LTD.
Plug in your device via the usb cable and sync. Once that's done you should have a prompt to "Register Device" under the section "Signing (Debug)". Click that.
You can repeat steps 4-6 for Neds targets by selecting team as Neds International PTY. Ltd.
If you can't run the app at this point you'll need to create a new signing certificate and add it to your Apple developer account most likely. To do that you can follow the steps in the collapsed section below:
Click to expand signing certificate setup instructions
- Open the Mac Application Keychain Access and select Keychain Access > Certificate Assistant > Request a Certificate From a Certificate Authority. You'll be presented with the window below. Make sure you fill out the fields User Email Address with the same email you used for your Apple Developer Account and Common Name with your name. Select saved to disk and then hit continue. This will save the request to your computer which you can now upload to Apple.
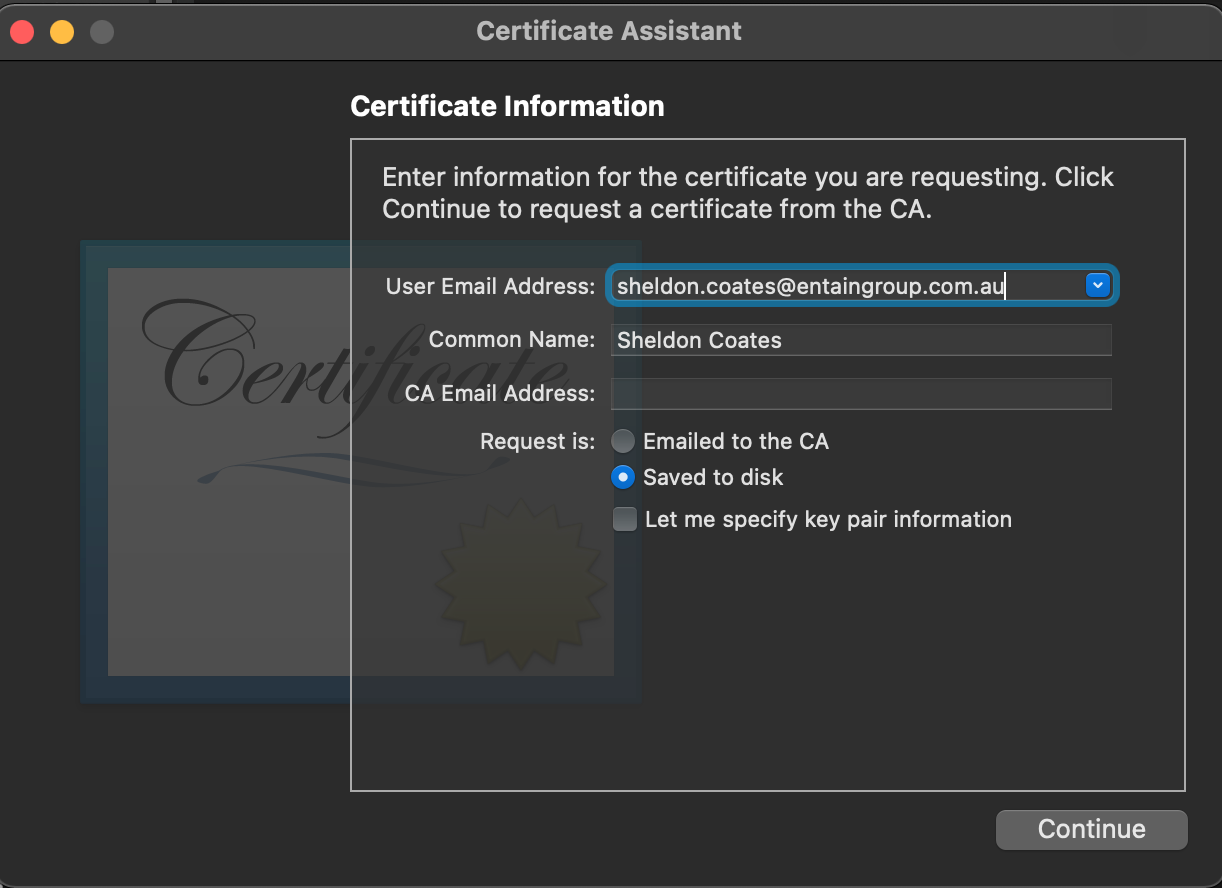
- Head on over to Apple Developer Program and sign into your account. Once there, select Certificates, IDs & Profiles.
- You can now click the "+" to upload your cert signing request to Apple here. It's important to note that you have to do this for both Neds and Ladbrokes as highlighted in the picture below. Once you've complete these steps start over from step 1 for the other app which you haven't done yet.

- Once you click "+" you can select "Apple Development", hit continue then upload the request. Once uploaded and processed you should be able to download a certificate which you can double click to open up and it will be added to your Keychain Access.
- Now try to run by selecting LadbrokesApp/NedsApp and your device in Xcode. Ta-da (hopefully).
Android on physical device
Through a Macbook
There are different ways to run the app on a physical device, for Android the easiest way is to use Android Studio instead of CLI. Make sure you get a device if you don't already have one, by asking your team's Delivery Lead or getting in touch with Desktop Support directly.
Assuming you have already done set up your dev environment and are able to install and run the app on your machine in a simulator/emulator, follow the steps below.
- Make sure Developer Mode and USB debugging is enabled on the physical device.
- Make sure your physical device and your laptop are on the same WiFi network.
- If you are working from home, make sure you are connected to the VPN.
- Plug in your device via USB to your work laptop.
- Make sure your device has a connection to your laptop by typing in the terminal
adb devices. - Run
yarn setupin your project folder. This will install the dependencies, and will update the network security config inandroid/app/src/main/res/xml. - Open Android Studio.
- On the welcome screen, open the
Androidfolder in your React Native project. (Do not open the React Native project, but the 'Android' folder inside it). - Build your project using the hammer icon in the top navigation bar in Android Studio. This step might take a while, but only when you are running it the first time. Wait. Drink a coffee.
- Once the app is built, click 'Build Variants' tab on the bottom left corner in Android Studio. (or top menu -> View -> Tool Windows -> Build Variants) Select the correct option next to the :app option (for example 'NedsUatDebug' for Neds debug pointing to UAT).
- Now run Metro: Open an iTerminal or an external terminal. Type
yarn [BRAND](eg.yarn neds). Metro will be running on port 8081, and your physical device will be accessing Metro through this port. - At this point everything should be set up, you are good to go!
- Run your app by clicking the green rectangle (run) icon in the top navigation bar in Android Studio.
- The app should be built on your phone in about a minute or so.
- You might get a big red error on your phone or the app might be stuck. In this case, shake the device to trigger the developer options. (might have to shake it a few times) Now go to Settings -> Debug Server Host & port for device, and enter your laptops's IP address, following by Metro's port number (eg. 10.37.25.237:8081). Type
ipconfig getifaddr en0in iTerminal to find your IP address. This must be the same IP address that you have inandroid/app/src/main/res/xml/debug_network_security_config.xml. - Done :)
Note: If you are working from home, you will have to connect the device to Entain Group VPN. Instructions can be found here.
Troubleshooting: If you encounter any issues, follow the steps below:
- Search for the issue keywords in Slack. Someone else might have had the same issue.
- Google it. Surely, someone else has had the same issue.
- If nothing works, ask #chapter-native-apps channel.
Through a Linux laptop
[⚠️ Missing info! If you have knowledge that covers this topic, help the chapter out by contributing some notes here]
Production Builds
Android Production builds
Gradle generates individual tasks for all combinations of app flavours and variants we have in our build.gradle file. To see all available gradle tasks, run cd android && ./gradlew tasks.
Generally speaking you're looking to either build an UAT or Production .apk file to test in a real device or simulator. To generate those, use the gradle assemble<Brand><Env><BuildType> commands such as :
assembleLadbrokesUatRelease,assembleLadbrokesProductionRelease,assembleLadbrokesProductionDebugassembleNedsUatRelease,assembleNedsProductionRelease,assembleNedsProductionDebug
Before you do this though there's 2 crucial steps you need to follow:
In
./android/app/build.gradle, underbuildTypes.release, make sure you swapsigningConfig signingConfigs.releasetosigningConfig signingConfigs.debug, like so: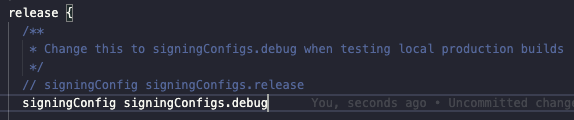
You need to set a
BRANDenvironment variable when running the desired gradle task, otherwise you'll get build errors. For example:
BRAND=ladbrokes ./gradlew assembleLadbrokesUatRelease

BRAND=neds ./gradlew assembleNedsProductionRelease
Once completed, these commands will generate .apk files under ./android/app/build/outputs/apk/<brand><Env>/<BuildType>/. Simply transfer those to your device and test away.
iOS Production Builds
[⚠️ Missing info! If you have knowledge that covers this topic, help the chapter out by contributing some notes here]